Others
How to Set Print Area in Google Sheets?
Article written by Kate Williams
Content Marketer at SurveySparrow
7 min read
19 September 2025

60-Second Summary:
Tired of printing cluttered Google Sheets? Setting a print area is your solution! The blog breaks it down into four simple steps:
- Structure Your Data: Organize and format your sheet so only the relevant cells are included in your printout.
- Select What to Print: Highlight the cells you want, click the printer icon, and choose “Selected Cells” in the print field. You can further tweak settings in the print preview and print or save as PDF.
- Change Print Scope: Need to print from multiple tabs or the whole workbook? In the print menu, switch between “Current Sheet” and “Workbook” to control what gets printed.
- Customize Your Output: Adjust paper size, margins, headers/footers, and alignment for a polished, professional look.
SurveySparrow’s integration with Google Sheets lets you export survey data directly, or use their add-on for seamless data management and printing.
It’s no secret that Google Sheets is the most popular application when it comes to data management. It’s used across organizations by various teams, all adding to the importance of the app.
When it comes to presenting your data in physical form, knowing how to set print area in Google Sheets becomes important. Whether you’re preparing for a quarterly meeting, creating a client report, or simply need a hard copy of important information, properly configured print settings ensure your data looks professional and readable.
In this comprehensive guide, we’ll walk through everything you need to know about setting print area in Google Sheets that will make your printed spreadsheets look perfect every time.
Understanding Print Areas in Google Sheets
Before diving into the process, it’s important to understand what a print area actually is. Unlike Microsoft Excel, which has a specific “Set Print Area” function, Google Sheets handles print areas differently.
In Google Sheets, the print area refers to the range of cells that you want to include when printing your spreadsheet. By default, Google Sheets will print the entire active sheet, but you can customize this to print:
The entire spreadsheet
The current sheet only
Selected cells only
Multiple sheets within a workbook
Understanding these options is the first step to mastering how to set print area in Google Sheets effectively.
Step-by-Step Guide on Setting Print Area in Google Sheets
The following listed are 4 simple steps you can follow to set the print area in your Google Sheets.
Step 1: Structure Your Data
The print area usually refers to the cells in the sheet you want to print.
Best practices for print-friendly data formatting:
Use clear, readable fonts (11-12pt size is generally optimal for printing)
Apply appropriate cell formatting for numbers, dates, and currencies
Add borders to important tables or data sections
Consider using alternating row colors for better readability
Ensure column widths are appropriate (not too wide, not too narrow)
Check that all important data is visible (no hidden content in cells)
Taking the time to properly format your data before printing will save you frustration and resources in the long run.
Step 2: Select What You Want to Print
Start by selecting or highlighting the cells you want to print. Once that’s done, click on the printer icon in the Google Sheets tool and change the print field to Selected Cells.
You can make further formatting changes in the print preview window.
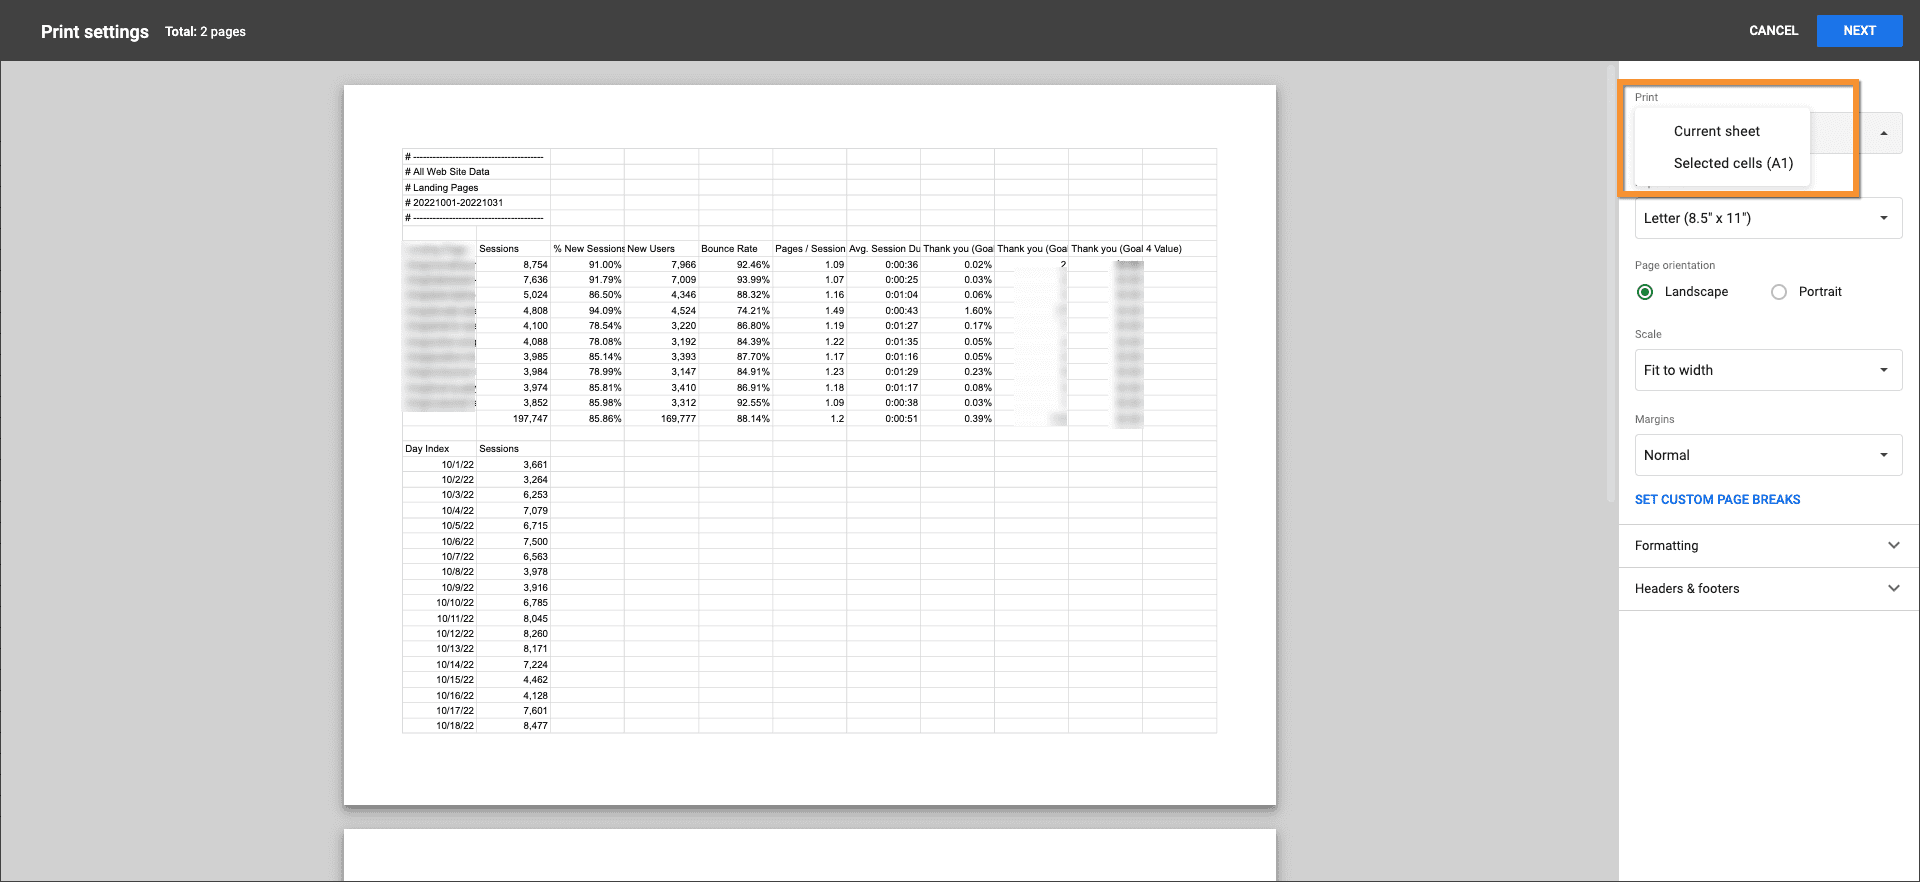
Now that you have set what you want to print, you can either select the printer you want to use or save it as a PDF file for later.
Step 3: Change What You Want to Print
It’s possible that the data you want to print is not in one place. In fact, these data can be spread across multiple tabs within the sheet. In such cases, what you can do is change your settings on the print menu.
By default, it will be showing - Current Sheet. You can either keep that or print the entire workbook by selecting - Workbook - in the print dropdown menu.
Step 4: Customization
So far, we have discussed selecting what you want to print from Google Sheets. Now, let’s have a look at how you can print.
You can format or customize how your cells, sheets, or workbooks appear when printed. In addition, you can adjust the elements like paper size, insert a header/footer, and change the alignment of the sheet on Google Sheets as well.

Advanced Print Area Techniques
Print Multiple Ranges
Sometimes you need to print non-adjacent areas from the same sheet. Here’s how to do it:
Select your first range of cells
Hold down Ctrl (or Cmd on Mac) and select additional ranges
Follow the standard printing process, making sure to select “Selected cells”
Google Sheets will print each selected range on separate pages unless they can fit together on a single page.
Setting Print Titles
For multi-page printouts, you may want certain rows or columns (like headers) to repeat on every page:
Go to File > Print
Click on Set up at the bottom of the print preview
Under “Repeat,” choose:
“Frozen rows” to repeat top rows on every page
“Frozen columns” to repeat left columns on every page
This ensures that your data remains labeled and easy to understand across multiple printed pages.
Creating Print-Friendly Views
For spreadsheets that you print regularly, consider creating a print-friendly view:
Create a separate sheet specifically for printing
Use formulas like VLOOKUP or QUERY to pull in only the data you need
Format this sheet specifically for printing
Save these print settings for future use
This approach allows you to maintain your working spreadsheet while having a clean, print-optimized version ready whenever you need it.
Common Print Area Issues and Solutions
Even when you know how to set print area in Google Sheets, you might encounter these common challenges:
1. Content gets cut off on printed pages
Solution: Adjust scale settings or orientation in print preview
Alternative: Use “Fit to page” option to ensure all selected content appears
2. Headers don’t appear on all pages
Solution: Use the “Repeat frozen rows” option in print setup
Alternative: Manually insert page breaks where appropriate
3. Print area includes unwanted blank cells
Solution: Be more precise with your cell selection
Alternative: Create a filtered view that shows only the data you want to print
4. Print preview looks different from actual printout
Solution: Save as PDF first to confirm exact layout
Alternative: Adjust margins to account for printer limitations
Knowing these troubleshooting techniques will help you master setting print area in Google Sheets for any situation.
Google Sheets Integration with SurveySparrow (and Add-ons)
Google Sheets is one of the most robust integrations available with SurveySparrow. It’s not just about exporting data from ongoing surveys, rather, you can export previous survey data as well.
The best part…the integration is just one click away.

You can either export the data to a new sheet or to an existing one. Just add in your Google Sheets URL and the tool (SurveySparrow) will automatically do the rest.

SurveySparrow Add-ons
If you don't want to integrate, there’s an alternative for you - Google Sheets add-ons.

Just go to Extensions, click on Add-ons, and install SurveySparrow add-ons. From exporting data from existing surveys to creating a new one, the add-on helps you with all. That’s how effective it is.
Intrigued? Sign up and experience it for yourself!


Thousands of brands trust SurveySparrow to turn feedback into growth. Try it free today!
Kate Williams
Frequently Asked Questions (FAQs)
A print area refers to the specific range of cells you want to print from your spreadsheet. By defining it, you avoid printing unnecessary or blank cells.
Simply highlight the cells you want, click the printer icon, and in the print settings, choose “Selected cells” under the “Print” dropdown.
Yes. In the print dialog, switch from “Current Sheet” to “Workbook” to print all tabs at once. Make sure each sheet is formatted correctly.
Google Sheets automatically adjusts formatting. Use print preview to tweak settings like margins, orientation, and scale for a more accurate layout.
Related Articles

Survey
Google Forms RSVP: How to Create a Better RSVP Form
9 MINUTES
4 February 2026

Survey
How To Add Tables In Google Forms?
10 MINUTES
25 July 2022

Survey
How to Do a File Upload on Google Forms?
8 MINUTES
19 March 2024

Others
Harnessing AI: Transformative Strategies For Launching Your Startup
8 MINUTES
30 July 2024
